Rancher 2.0: Exciting Features You Should Know About

Rancher 2.0 was made GA (generally available) on May 1st, and there is quite a bit to be excited about. Providing a managed Kubernetes distribution, Rancher is deterministic in deployment and lightweight in installation. Its simplicity and flexibility can make it ideal for straightforward infrastructures that lack managed Kubernetes offerings and need to be built from the ground up. While previous versions already made for a fairly useable platform, Rancher 2.0 is a much more comprehensive solution.
Rancher already had AD (Active Directory), LDAP, and SAML (Security Assurance Markup Language) support, but Rancher 2.0 has gone further and now includes features like enhanced catalog support for Helm, better CI/CD integration, alerts, and centralized logging. The availability of its Application Catalog is particularly helpful, as it allows you to quickly deploy pre-built application templates. Leveraging Helm, Rancher has also extended its automation abilities.
Rancher 2.0 has also expanded its cloud-agnostic capabilities. It was originally designed to to be cloud agnostic at the orchestration layer, seeking to bring together users of Kubernetes, Docker Swarm, and Rancher’s own Cattle. Now that Kubernetes has established itself as the industry standard for container orchestration, Rancher has evolved to use Kubernetes as its sole container orchestrator. Rancher 2.0 provides the management of Kubernetes clusters on all major public cloud providers, namely Google’s GKE, Azure’s AKS, and Amazon’s EKS, as well as other Kubernetes clusters, such as Canonical. Rancher does this by abstracting the authentication, for example, away from the cloud provider so that Kubernetes can be run on the respective engines of different providers. Exposing a single pane for all Kubernetes operations, Rancher 2.0 makes for quite a powerful tool.
Install Rancher 2.0
To start realizing what Rancher 2.0 has to offer, deploy Rancher by running:
$ sudo docker run -d --restart=unless-stopped -p 80:80 -p 443:443 rancher/rancher
This will create a default admin user. If you’re doing this on cloud.ca, you will have to manually add the provider from GitHub, as the cloud.ca provider is currently not available by default. EKS GKE, AKS and Packet.net are all available by default.
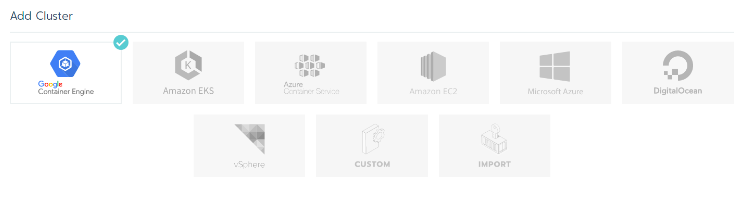
Once Rancher is deployed, you can create a Kubernetes Cluster using one of the default providers, as shown below.
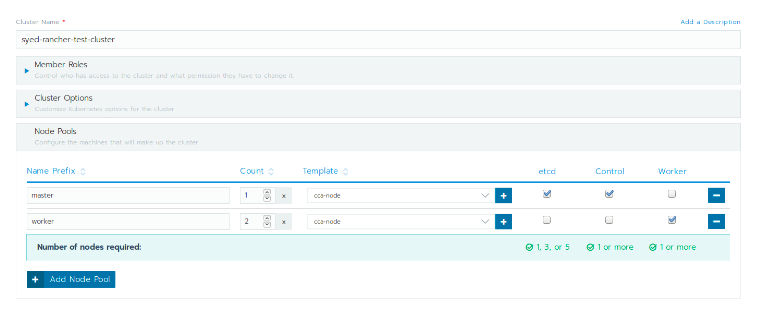
In this example, I used Rancher to run a Kubernetes cluster on cloud.ca, which means manually adding nodes and selecting cloud.ca as a custom cloud provider. For my use case, I needed two worker nodes and one master node that ran Etcd. While the number of nodes and their function will depend on your specific use case, you ideally want at least one master node and three Etcd nodes.
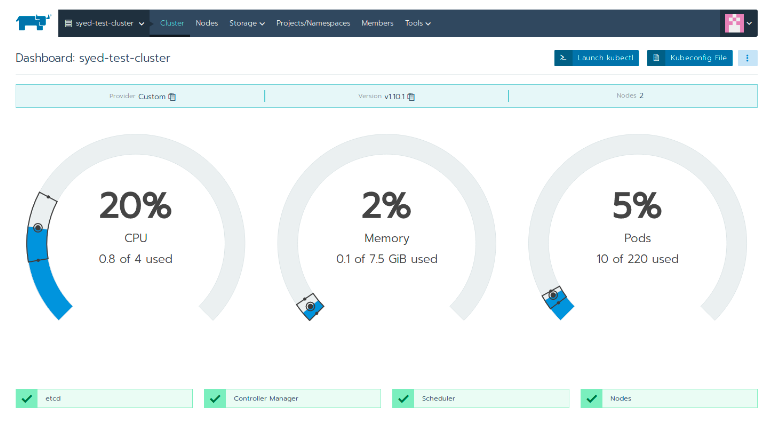
Rancher will automatically configure and install all the components required by Kubernetes to give you a running cluster. The main dashboard of a Cluster can be seen below – it shows the overall health of the Cluster and its CPU/Memory usage as well as general information about the version of Kubernetes being run.
Features
Rancher provides a UI for most Kubernetes resources, namely Pods, Services, and Ingresses. In this blog post, I’ve listed some new features offered by Rancher 2.0
Cluster Level Features – The options from Rancher’s features that are available at the cluster level can be applied throughout the whole cluster.
Projects
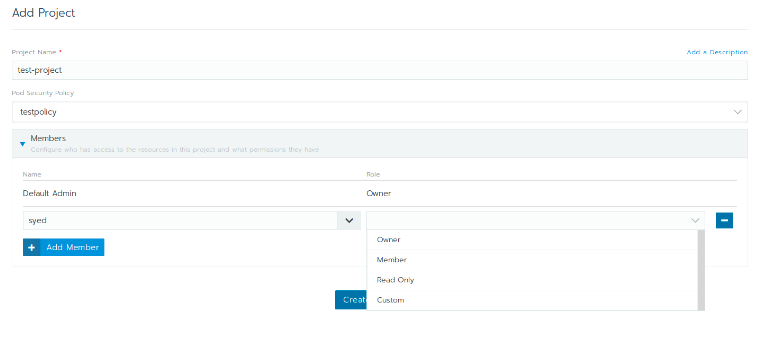
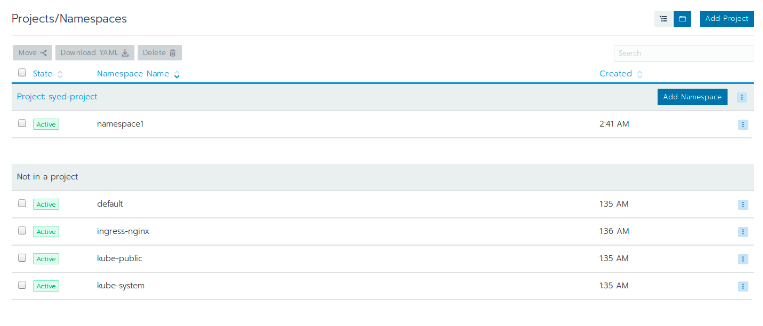
Projects are a new concept introduced by Rancher 2.0. They are collections of namespaces, and they allow you to have finer control over resources. In Kubernetes, namespaces are the only means from which to isolate components between different users. However, this becomes insufficient when single users need to access multiple namespaces in different environments. By adding Projects as an added layer above namespaces, Rancher 2.0 eliminates the need to add single users to each namespace, making it much easier for administrators to manage user permissions.
Rancher provides a comprehensive UI for creating Projects and namespaces. When creating a Project, assign users with specific roles that define permissions. Namespaces can either be created inside Projects (and inherit roles from that Project) or stand alone. PodSecurityPolicies can also be assigned to Projects and its accompanying namespaces.
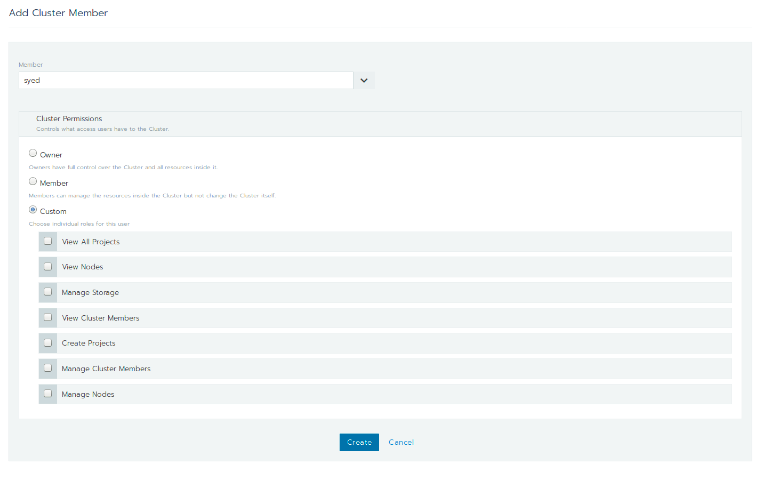
Cluster Members
Members are users within Kubernetes clusters, and the same user can be assigned different roles (either admin, regular user, or a custom role that you created) in different clusters that they’ve been added to. Single users can use Rancher 20 to access multiple Kubernetes clusters while maintaining different roles in different clusters, and not be forced to use different authentication keys when switching clusters.
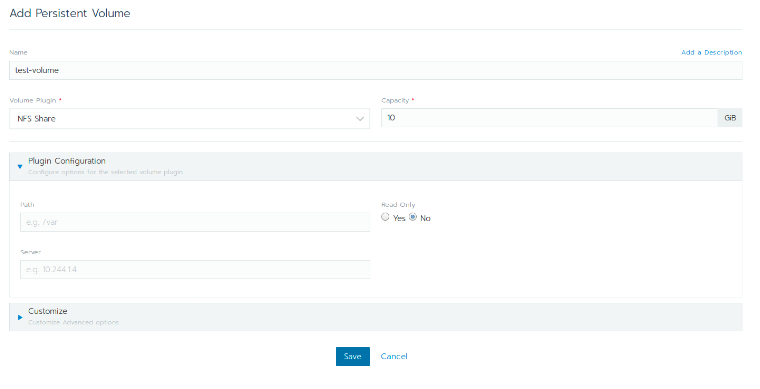
Rancher Storage
Rancher Storage lets you add either a storage class or a persistent volume to the cluster via the UI. It gives you a list of available storage plugins along with their required options. For example, if you select NFS as the plugin, it will ask you to input the server address and remote path.
Added Features
There are a few more cluster-level features that Rancher 2.0 has added. For example:
1. Notifiers – Notifiers allow you to publish alerts to various sources, including Slack, email, PagerDuty, etc.
2. Alerts – You can configure alerts to events, such as a Host CPU that is greater than a given threshold or the creation of a deployment.
3. Logging – Rancher collects the standard output and standard error for each container, the log files of which are under path /var/log/containers/ on each host. The logs can be copied to various targets, such as ElasticSearch, Syslog, etc.
4. Pipeline – Rancher 2.0 provides a convenient UI to set up CI/CD pipelines. GitHub is currently supported.
Project Level Features – Workloads and Catalog Applications are the two most important features at this level.
Project Dashboard
Rancher’s UI will show most resources that are specific to Kubernetes, including pods, secrets, and configmaps. Rancher also adds a catalog option from which you can deploy applications using Helm. See below for the project view provided by the dashboard.
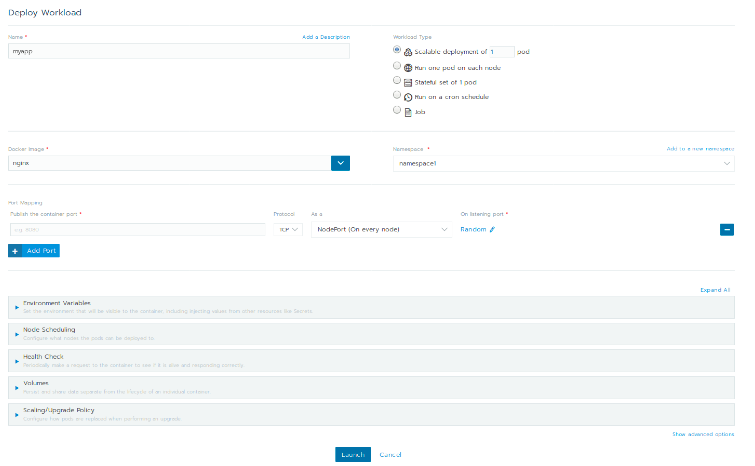
Workloads
Workloads allow you to create various kinds of resources, namely pods, deployments, Daemonsets, jobs, and scheduled jobs. The UI exposes many options that are available to configure the workload you want to deploy including adding environment variables, health checks and scaling policies. The UI also allows you to add/configure ingresses for the deployments and add custom DNS records for service discovery. It also allows you to add/configure Persistent Volume Claims to your workload based on the Persistent Volumes set at the cluster level. Basically, workloads provide a very comprehensive UI from which to create resources on Kubernetes.
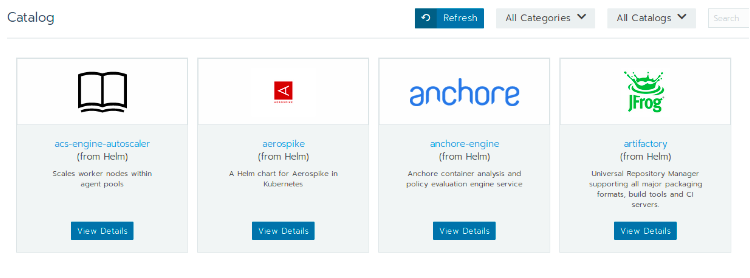
Catalog Applications
This feature uses Helm to quickly deploy applications. The new logic with Rancher 2.0 automates the creation of namespaces when apps are deployed. When deploying a helm chart using Rancher, the helm chart discovers the different configuration parameters for the application and provides a UI for adding them easily. Rancher provides an easy interface for using upgrade/rollback to edit the application.
Project/Namespace Members
As per the name, Rancher Members lets you add members to projects. By default, only the admin is added. You can assign cluster members and roles to each project, which will define what the user can do at the project/namespace level. Such operations would include view/edit secrets, configmaps, services, etc.
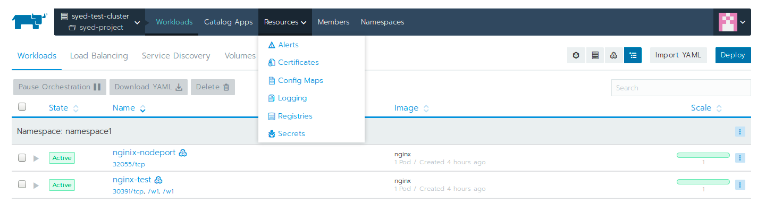
Other Resources
1. Alerts – You can add alerts for pod/deployment level events. For example, send an alert when a deployment is below a threshold level of replicas.
2. Certificates – Certificates let you add public or private key pairs. However, this didn’t seem to work for me. Adding private keys always seemed to give me errors that the key was invalid.
3. ConfigMaps/Secrets – A single UI is provided for their management.
4. Logging – You can choose where to push the logs to, similar to the cluster logging.
5. Registries – Registries, specifically private registries, can be configured for a project.
Previous versions of Rancher already provided an easy and reproducible way to deploy containers. The primary focus of Rancher 2.0 was to make the distribution integrate more strongly with Kubernetes. The addition of an Application Catalog greatly simplified the deployment of common applications. Projects for the management of user permissions grant another layer of control for Cluster admins. These features amongst many more make Rancher 2.0 ideal for integrating with various Kubernetes solutions provided by multiple clouds with a single pane of authentication. I’ve truly been impressed with what Rancher 2.0 has to offer. Sign up for one our hands-on, three-day workshops to learn more about Docker and Kubernetes.
 Syed Mushtaq Ahmed
Syed Ahmed is a software developer at CloudOps. He focuses on integrations and hard-to-solve problems. With extensive knowledge throughout both the hardware and software stacks, he adds a unique perspective to solving integration and orchestration challenges. Syed is an avid open source contributor, and a Commiter and PMC in the Apache Cloudstack project. Syed helps drive workshop content for CloudOps’ workshops that cover solutions including Docker and Kubernetes.