How to Create Infrastructure as Code with GCP Deployment Manager: Your third step towards DevOps automation

This blog post is the third of a series.
If you missed the first two, here are the links for you to explore: Geeking out at
How to Create Infrastructure as Code with Terraform in GCP: Your first step towards DevOps automation
How to Create Infrastructure as Code with Packer and Terraform on GCP: Your second step towards DevOps automation
In the previous two posts we focused on Infrastructure as Code, viewing Terraform as our multi-cloud capable swiss army knife. But what if you just want to leverage a specific cloud infrastructure deployment service?
Google Cloud Platform (GCP) has such a tool and it’s called Deployment Manager. Deployment Manager bases its execution on config files (YAML) and templates (JINJA2 or PYTHON) and allows you to define your resources. Deployment Manager is a GCP-only tool and as such allows you to access both Beta and Alpha features.
In this blog post I will show you a small Deployment Manager template, just like I did in the first blog post, but I will also review the deployment manager version of my bigger Terraform template from blog post #2. All of this will be running in the NorthAmerica-NorthEast-1 region.
Prerequisite:
NOTHING!!!! Just use the GCP Cloud Shell to run all of these blog post examples in Google Cloud.

Simple but working
Create a single instance in NorthAmerica-NorthEast1-a based on the latest Ubuntu-1804-LTS image, an external IP.
resources:
- name: my-first-vm
type: compute.v1.instance
properties:
zone: northamerica-northeast1-a
machineType: https://www.googleapis.com/compute/v1/projects/your_project_name/zones/northamerica-northeast1-a/machineTypes/f1-micro
disks:
- deviceName: boot type: PERSISTENT boot: true autoDelete: true initializeParams: sourceImage: https://www.googleapis.com/compute/v1/projects/ubuntu-os-cloud/global/images/family/ubuntu-1804-lts networkInterfaces:
- network: https://www.googleapis.com/compute/v1/projects/your_project_name/global/networks/default
accessConfigs:
- name: External NAT
type: ONE_TO_ONE_NAT
Once your template is created, just run it either from wherever you installed the Google Cloud SDK or within GCP Cloud Shell, my personal favorite.
gcloud deployment-manager deployments create my-first-dm –config my_first_vm.yaml
You can view your Deployment in the GCloud Console under Deployment Manager and the instance in Compute Engine / VM instances. You can also see the details of your new deployment with:
gcloud deployment-manager deployments describe my-first-dm
This is a simple example and will probably look familiar if you are used to Terraform. Now let’s clean this up and go bigger.
gcloud deployment-manager deployments delete my-first-dm
Go big or go home
Based on my second blog post, we will recreate the same concept but all in Deployment Manager (Besides the image baking with Packer).
Let’s Bake Our Golden Image
1. Get your service account information by following steps 2 and 3 in my first blog post. Make sure you have the following roles (Compute Admin, Service Account User, Storage Admin).
2. Get the code from my repo.
3. Update the apache.json file with your GCP account information.
4. Install Packer.
5. Bake
packer validate gcp-dm/apache.jon
packer build gcp-dm/apache.json
Let’s Build Our Immutable Infrastructure
Step 1: Build our Instance Template, Managed Instance Group and Auto-Scaling policy.
We are creating an Instance template called ‘apache-template’ with a tag called ‘webserver’ that is linked to an f1-micro machine type using the Apache family image we backed with Packer. We are also injecting some MetaData for a startup script, which will prep a web page from our Apache to our server.
https://github.com/sveronneau/gcp-dm/blob/master/instance-template-mig.yaml
IMPORTANT: Make sure you change the value of you_project for SourceImage and network before you run this one so it reflects your Project ID.
gcloud deployment-manager deployments create apache –config instance-template-mig.yaml
Step 2: Create a Firewall Rule and Healthcheck
Create Firewall rules allowing HTTP, HTTPS, SSH and PING only for instances with the ‘webserver’ tag and a HealthCheck for the upcoming LoadBalancer.
https://github.com/sveronneau/gcp-dm/blob/master/firewall-rules.yaml
https://github.com/sveronneau/gcp-dm/blob/master/hc.yaml
gcloud deployment-manager deployments create firewall –config firewall-rules.yaml
gcloud deployment-manager deployments create healthcheck –config hc.yaml
Step 3: Create the Load Balancer
The Final step is to create the necessary elements required to expose our instance group to the internet via a public IP linked to a Load Balancer and Forwarding Rules.
1. Backend Service
Maps to my Managed Instance Group for HTTP traffic on port 80.
2. URL Map and Proxy
Set to default value, nothing fancy so all traffic on the URL / goes to the Backend Service we just created.
Map a new proxy to this URL Map
3. Public IP
Let’s reserve a nice Public IP for our LoadBalancer
4. Forwarding Rules
Define a Global rule that will forward all traffic to port 80
https://github.com/sveronneau/gcp-dm/blob/master/LoadBalancer.yaml
gcloud deployment-manager deployments create load-balancer –config LoadBalancer.yaml
Step 4: Fix the Named Port in the Managed Instance Group but with GCLOUD command

Note.To allow this instance group to receive traffic from the load balancer apache-url-map, map the port name http to a port number.
You may get a little warning in your Managed Instance group related to Port Name and Port Number. In order to fix this, just run the following command in your Cloud Shell:
gcloud compute instance-groups set-named-ports apache-mig –named-ports http:80 –zone northamerica-northeast1-a
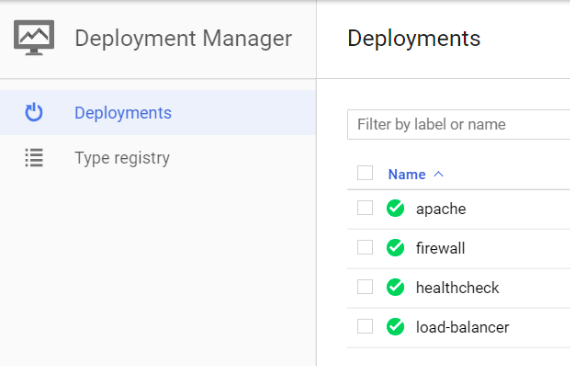
Step 5: Looking at the Deployments
Once all the Deployments are done, you can see the instances, managed instance group, public IP, Backend/Front end services, Load Balancer and deployments all in th GCP console
Here is a look at the Deployment Manager GCP console when we are done:
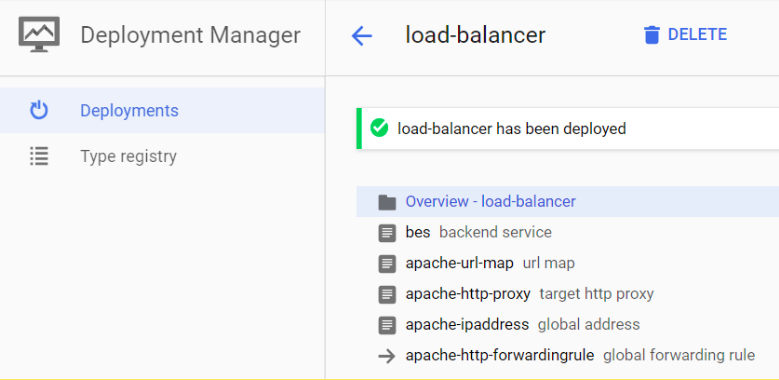
If you click on one deployment, like the load-balancer, you will get all the details and configs from it.
Step 6: Testing it out
Now that all is deployed, go get your Public IP from Network services / Load Balancing. Once you are in that section of the GCP Console, click on apache-url-map and in FRONTEND beside HTTP. You’ll see the Public IP we’ve asked for before.
Point your browser to http://public_ip and you should see a small website telling you which server from your Managed Instance Group your request is going towards. This may take a few minutes since we have to make sure the Load Balancer is provisioned and running properly in GCP.
Once the site replies, go crazy on the refresh and see your request being Load Balanced between nodes.
That’s a wrap!
There you have it, a fully scripted deployment of our website with auto scaling and load balancing capability (just flood your Managed Instance Group and what it grow) and all done with Deployment Manager.
Don’t forget to clean up!
Now go forth and Automate All The Things!
With all three blog posts, you have seen the basis of what immutable infrastructure can be. If you implement these principles and methodologies in your application lifecycle management, you will make your life a lot easier. I hope you’ve found these blog posts on implementing Infrastructure as Code on GCP helpful and that it will help you achieve DevOps nirvana.
- name: External NAT
type: ONE_TO_ONE_NAT
© CloudOps. All rights Reserved. // Privacy Policy