How to Generate and Use Dynamic Secrets for AWS IAM with Vault using Kubernetes & Helm

Your first step to securely store, access, and deploy sensitive application information
In today’s API and Cloud-platform driven world, we operators, developers, and architects are presented with the critical challenge of managing application secrets, encryption, and access to any application and infrastructure in the Cloud. Securing and rotating secrets regularly and properly, both in the Cloud and on-premise, can pose a significant challenge. However, it’s essential as your DevOps team embraces Infrastructure as Code.
In this blog post, we will create AWS Identity and Access Management (IAM) keys dynamically with a development Vault server deployed to Kubernetes with Helm.
Secrets are sensitive application configuration information. They include things such as AWS API keys, database passwords, and SSL and SSH private keys. In contrast to static secrets, which are defined ahead of time and are shared, dynamic secrets are generated on demand and are unique to the client. Because they don’t exist until they are read, dynamic secrets don’t have the risk of being stolen and are much more secure. Vault associates each dynamic secret with a lease, and automatically destroys the credentials of the secret when the lease expires. HashiCorp Vault empowers developers and operators to securely store, access, and deploy sensitive information to applications and infrastructure by employing a centralized workflow that keeps application secrets and data secure by encrypting data in-flight and at rest.
Vault associates each dynamic secret with a lease. When the lease expires, the credentials of the secret are automatically destroyed. Because they don’t exist until they are read, dynamic secrets have no risk of being stolen. Any dynamically-generated secrets are associated with leases, and Vault will automatically revoke these secrets after the lease period ends. The dynamic generation of unique client credentials allows us to create a moving target for attackers and minimize the risk of exposing credentials, while making it easier to do forensics, periodic rotation, or revocation.
Secrets Sprawl – HashiCorp Vault puts all your secrets in one place. It removes the need to put hard coded credentials into source code. More often than not, these hard coded credentials end up littered throughout configuration files and configuration management tools, and stored in plaintext in version control, wikis, and shared volumes making it difficult to pinpoint potential leaks in your infrastructure. Vault provides a secure place to store these credentials, and ensures that they are encrypted, and that access is audit logged and exposed only to authorized clients.
Secrets Rotation – Vault allows you to no longer view the sensitive information in your multi-cloud environment as static. The creation, rotation, and encryption of secrets is automated into your CI/CD pipeline. As secrets are rotated on a frequent basis, any hacker who gains access to your secrets one week will lose access the following week.
Access Revocation – Access control policies also provide strict control over who can access what secrets. Vault builds revocation mechanisms into their dynamic secrets. They can therefore be revoked immediately after use, which minimizes the amount of time that the secret ever existed. Vault makes dynamic secrets more secure, and allows them to be deployed on multiple cloud environments.
Portable Deployments – The deployment of dynamic secrets has traditionally been limited to the hyperscale cloud provider. Vault enables secrets to be ported over private and public clouds, as well as be supported on all sorts of servers and databases. Some examples of other secrets engines it supports include: Databases (PostgreSQL, MySQL, MSSQL, Oracle, etc.), NoSQL (Cassandra, MongoDB, etc.), Messaging Queues (RabbitMQ, etc.), Cloud Providers, SSH, and PKI.
Vault allows you to have the best of both worlds, and have dynamic secrets that you can transport over multiple environments. It does this by storing your secrets in a HashiCorp system that supports multi-cloud deployments.
Use Case: An ex-employee, hacker, or thief with API access obtains secrets via an application with API credentials
Many companies store their secrets in environmental variables or a config file (how the AWS API or CLI works out-of-the-box), or hard code them into the version controlled source code itself. Please do not do this. Vault offers a better solution.
Let’s say that an employee with “Power User” or similar privileges to a Cloud service provider gets fired or has their laptop stolen from a coffee shop. The thief or ex-employee could gain access to sensitive data by using the API keys formerly used as environmental variables for connecting various Cloud APIs. They could then delete data and backups, terminate servers, and cause widespread damage to the Cloud infrastructure of the organization.

This is different than Console or API access that is tied to an Identity Provider, like Active Directory. As you now have to manually disable and rotate the individual API keys used by each application, the operational team will have headaches from the resultant downtimes.
Not only does HashiCorp Vault solve this problem, but it allows you (with one single command) to revoke API keys (specifically ones that employees with stolen laptops or the ex-employees ever gained access to) and generate new ones for the application to use. Basically, the application will automatically request a new API key to be generated using HashiCorp Vault’s very well documented API interface.
The power to revoke and renew access to secrets automatically is a key feature. Additionally, each of those requests are logged, and can be audited and archived for compliance reasons. Other Secrets storage techniques do not offer you that kind of logging and auditing capabilities, especially when making individual APIs request an API key, or access a service using the API key.
Vault eliminates secrets sprawl, and manages secret lifecycle by revoking and rolling the API keys or Database passwords automatically. It provides detailed audit logs with granular access control to the team or the organization that has access to create secrets, read secrets, and renew or revoke application secrets.
Tutorial – Deploy a development Vault server to Kubernetes using Helm
In this tutorial, we are going to deploy a development Vault server to Kubernetes using Helm and the incubator Helm chart. The dev server stores all its data in-memory (but still encrypted), and automatically unseals and shows the Vault unseal key and root access key when requested. You should never run a dev mode server in production.
Helm and Helm Charts
Helm helps manage Kubernetes applications. Helm Charts help you define, install, and upgrade even the most complex Kubernetes applications. It’s a package that contains all the resource definitions necessary to run an application, tool, or service inside of a Kubernetes cluster. Think of it as the Kubernetes equivalent of a Homebrew formula, an Apt dpkg, or a Yum RPM file. We are going use the “Vault” incubator chart from Kubernetes.
What You’ll Need
Before starting this tutorial, make sure that you are using a Kubernetes cluster with a version of 1.6 or above. Make sure that Helm is installed on your client machine, and that you have kubectl installed and configured to connect to your Kubernetes cluster. If you have more than one cluster, use the development one for this tutorial.
Deploy Vault to Kubernetes using Helm
Once Helm is ready, initialize the local CLI and install Tiller into your Kubernetes cluster in one step:
$ helm initIf you type:
$ helm versionYou should see:
Client: &version.Version{SemVer:"v2.8.1",
GitCommit:"6af75a8fd72e2aa18a2b278cfe5c7a1c5feca7f2",
GitTreeState:"clean"}
Server: &version.Version{SemVer:"v2.8.1",
GitCommit:"6af75a8fd72e2aa18a2b278cfe5c7a1c5feca7f2",
GitTreeState:"clean"}
This means that Helm and its server-side component (Tiller) are installed and ready to be used. Let’s now add the incubator repository to helm:
$ helm repo add incubator http://storage.googleapis.com/kubernetes-charts-incubatorAt this moment, your Chart is using the Vault docker image from Docker Hub with a vault version of 0.9.0.
image:
  repository: vault
  tag: 0.9.0
  pullPolicy: IfNotPresent
In order to deploy a development version of Vault running, execute the following command:
$ helm install incubator/vault --name vault-devThis will provision a Kubernetes Service, Deployment, Pod and a ConfigMap automatically as seen below:
NAME:   vault-dev
LAST DEPLOYED: Wed Mar 14 17:13:43 2018
NAMESPACE: default
STATUS: DEPLOYED

RESOURCES:
==> v1/ConfigMap
NAME                      DATA  AGE
vault-dev-vault-config-1  1     0s

==> v1/Service
NAME             TYPE       CLUSTER-IP     EXTERNAL-IP  PORT(S)   AGE
vault-dev-vault  ClusterIP  100.68.247.74         8200/TCP  0s

==> v1beta1/Deployment
NAME             DESIRED  CURRENT  UP-TO-DATE  AVAILABLE  AGE
vault-dev-vault  1        0        0           0          0s

==> v1/Pod(related)
NAME                              READY  STATUS             RESTARTS  AGE
vault-dev-vault-764c78cd94-xqxfn  0/1    ContainerCreating  0         0s
Helm will provide a set of notes that you can use to connect to the Vault server using kubectl’s port forwarding capabilities:
NOTES:
1. Get the application URL by running these commands:
export POD_NAME=$(kubectl get pods --namespace default -l "app=vault" -o jsonpath="{.items[0].metadata.name}")
  echo "Use http://127.0.0.1:8200 as the Vault address after forwarding."
  kubectl port-forward $POD_NAME 8200:8200
Right now, the Vault server is only exposed internally to the Kubernetes cluster. Only Kubernetes services can communicate with each other, and not external users. You should be able to connect to the Vault server from any application running on Kubernetes by using the Service that was deployed by Helm:
http://vault-dev-vault:8200There is a way to expose it outside the cluster via an Ingress controller & resource. This is beyond the scope of this blog post. In our case, we are going to execute the first “export” command in the NOTES section in order to get the pod name that was deployed.
$ export POD_NAME=$(kubectl get pods --namespace default -l "app=vault" -o jsonpath="{.items[0].metadata.name}")To see the important Root Token needed to proceed with the AWS Dynamic Secret generation part of this blog post, execute:
$ kubectl logs $POD_NAMEWe should be able to see the following appear on our Terminal:
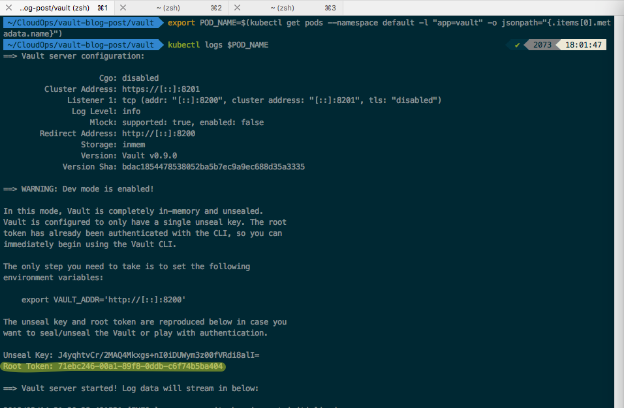
The root token is highlighted here. Please take note of it somewhere, as we will need it for later.
Next, port-forward to the Pod running on our Kubernetes cluster by executing the final NOTES command below:
$ kubectl port-forward $POD_NAME 8200:8200
This will allow our Local IP address (127.0.0.1:8200) to act as a proxy for the Vault server.
Next, open a new Terminal tab or a new Terminal window. After you open the new terminal, type this to export the Environmental variable:
$ export VAULT_ADDR='http://127.0.0.1:8200'We now need to download the Vault binary on our client machine to be able to communicate and execute Vault CLI commands. Vault is cross-platform, so this should work on any platform.
You should be able to vault Unix executable for Linux/Mac. Open your Terminal, and change your directory to the path where the Vault executable is stored and typed.
$ vault status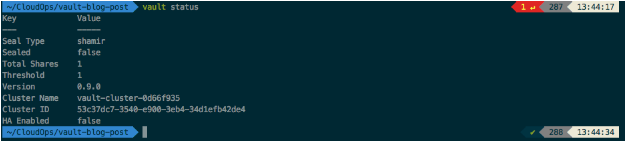
After that, login to the Vault server by pasting that Root token that we got from the logs section:
$ vault login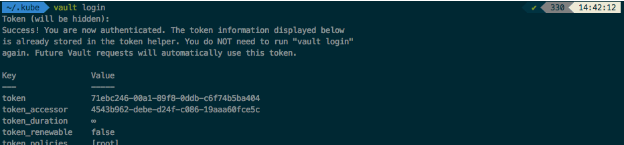
We have successfully created a centralized system for storing our secrets. We have put all our secrets in one place and used Vault to secure our assets in AWS. In order to fully leverage Vault, we now need to be able to generate dynamic secrets.
To enable AWS Dynamic Secrets on Vault, type this command into your terminal:
$ vault secrets enable -path=aws aws
Before proceeding, let’s configure our AWS account to use secrets.
Go to IAM Management Console and create a new User with the following permissions. Give it Programmatic Access only.
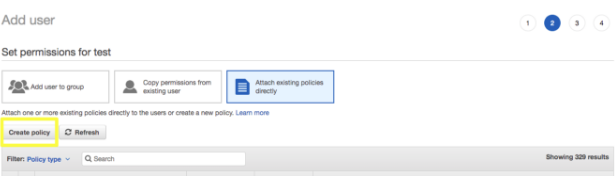
Create a policy and attach it to the user. Name it “hashicorp-vault-lab.” Make sure to replace your Account ID in the Resource. This is so that, when Vault dynamically creates the users, the username starts with the “vault-” prefix.
The account number can be found in AWS Support Dashboard:
{
"Version": "2012-10-17",
"Statement": [
{
"Effect": "Allow",
"Action": [
"iam:AttachUserPolicy",
"iam:CreateAccessKey",
"iam:CreateUser",
"iam:DeleteAccessKey",
"iam:DeleteUser",
"iam:DeleteUserPolicy",
"iam:DetachUserPolicy",
"iam:ListAccessKeys",
"iam:ListAttachedUserPolicies",
"iam:ListGroupsForUser",
"iam:ListUserPolicies",
"iam:PutUserPolicy",
"iam:RemoveUserFromGroup"
],
"Resource": [
"arn:aws:iam::ACCOUNT_ID:user/vault-*"
]
}
]
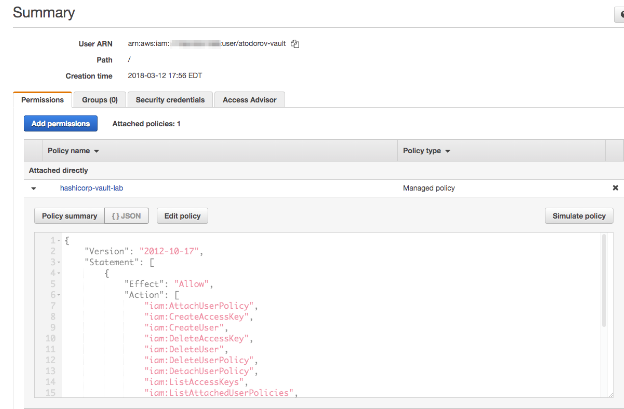
}You should have a user with the policy attached that looks like this:
You should also get a .csv file with the “Access Key ID” and “Secret Access Key.” You should only use those keys to configure Vault. Delete them immediately after from your computer for security reasons, as Vault handles the encryption for those keys internally. They cannot be read after they have been configured, only overwritten.
Here is an example of how you configure them. Please replace “access_key” and “secret_key” with your keys.
$ vault write aws/config/root \
    access_key=ACCESS_KEY_ID \
    secret_key=SECRET_ACCESS_KEY

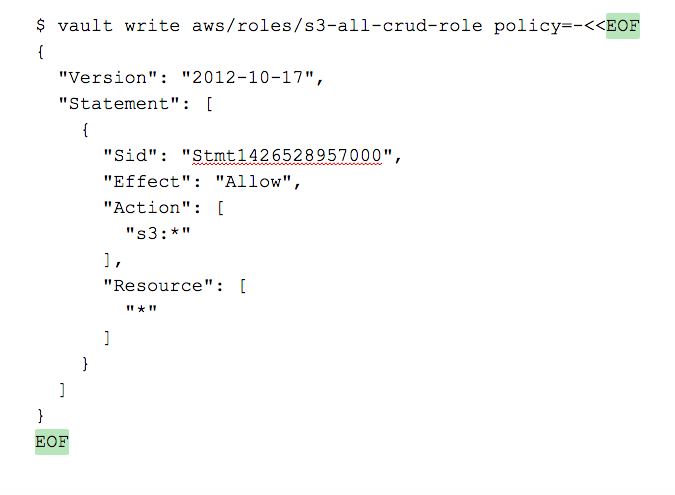
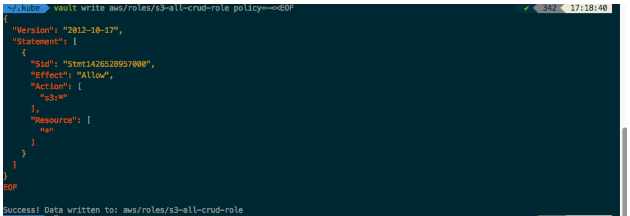
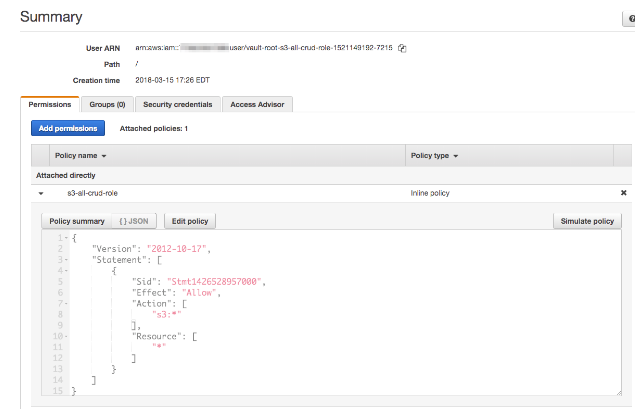
After that, create a role to use with Vault so that your application has a user with that role if needed. For example, your application might need a role that can do any CRUD operation on S3. Let’s create one here. You can restrict it as much as you like. Attach a policy to that role using a direct EOF (End-Of-File) statement:
If your cloud, on-premise, or serverless application needs to gain S3 access and use an API access key, you could simply use a Vault token to connect via the Vault RESTful API interface. In this case, your Vault token should be something other than your root credentials in production, which you would create specifically to enable your application to create access keys and be unable to read any other access keys. More information about the RESTful API can be found here. The particular point where you can use in your application is here.
For the sake of this tutorial, we are going to do it using the CLI Vault tool instead to generate a temporary IAM user using Vault:
$ vault read aws/creds/s3-all-crud-role
You can also output this in JSON format. By default, it’s in a table format so you can edit it with jq using the -format=json parameter.
$ vault read -format=json aws/creds/s3-all-crud-role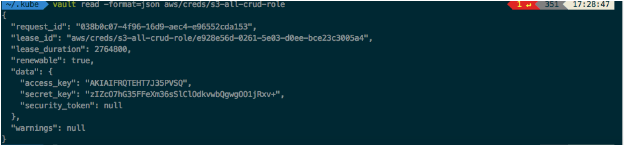
As you can see, it generated 2 entirely different credentials, and both of those credentials have a lease duration of 768 hours. This means that Vault will automatically delete the users in AWS in 768 hours.
If you go to AWS IAM and search for “vault-” you should be able to find them in there.
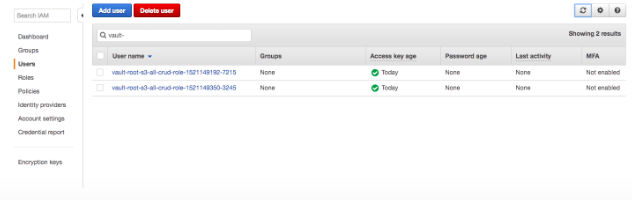
Vault Dynamic Secret generation is convenient because of it’s that it took the role, it generated the user, attached the policy to it and gave you back the access key and secret key:
You may also want to enhance security by configuring a 24 hour lease duration by writing to the configuration key-value store of Vault like this:
$ vault write aws/config/lease lease=24h lease_max=24hKeys generated with the new IAM users have a lease duration of 24 hours:

After 24 hours, Vault will automatically delete the user.
You should ideally use the lease_id to be able to renew the user so that the application does not have to constantly create new IAM users. To do this, use the lease_id provided by Vault to simply renew the lease
You can also use the Vault RESTful API here:
Let’s renew the license using the lease_id for just 1 hour by using 3600 seconds:
$ vault lease renew aws/creds/s3-all-crud-role/e928e56d-0261-5e03-d0ee-bce23c3005a4 3600
Houston, we have a problem. We have been hacked.
Let’s say that you use your monitoring tools to catch someone gaining access to one of your applications. However, they were able to copy one of your environmental variables containing the AWS API Key and Secret Access Keys that your application generated using Vault.
How can we stop that hacker from causing massive damage to your organization?
Simply revoke all leases that have those credentials using either the CLI or the RESTful API:
$ vault lease revoke -prefix aws/creds/s3-all-crud-role
As you can see, Vault was able to use the -prefix of s3-all-crud-role to revoke all leases for those roles:

Vault is an amazing tool that will streamline the security of your infrastructure. It will eliminate secrets sprawl and make it easy to find vulnerabilities. It will automatically rotate secrets, and revoke unauthorized access. Dynamic secrets are great on their own, but HashiCorp’s Vault takes them to the next level.
Check out my repos for more ideas on adding security to your Infrastructure as Code.
To learn more about using Docker and Kubernetes in AWS, sign up for our workshop. We offer a range of three-day, hands-on workshops to help you embrace DevOps practices.
 Adrian Todorov
Adrian Todorov is a Container Solutions Architect at CloudOps. He works closely with Kubernetes, AWS, GCP, and HashiCorp to drive application modernisation. Adrian is passionate about bringing modern cloud native development technologies and processes to clients, and hopes to guide readers through using open source projects in their applications.