Why Kubernetes Ingresses aren’t as Difficult as You Think

How to use Ingresses to Route your Services on a Vanilla K8s Deployment
If you’re using Kubernetes, you probably have deployments or stateful sets managing a number of pods that are running different microservices within a greater application. What use is this if your microservices can’t communicate with each other? They are running as a number of pods scheduled by Kubernetes, and these pods have assigned IPs and kubedns names that are both too mutable to be dependable for networking. Pods die and their IPs and names get re-assigned (except stateful sets with static hostnames). In the Kubernetes documentation services are described as abstractions that “define a logical set of Pods and a policy by which to access them.” Concretely, this means that a deployment will set up a label that describes the application name on the pods it creates and, when creating a service resource, the creator will use labels as selectors to group all pods running a given application. Services allow the actors that want to access applications to not have to keep track of what’s running on what pod and instead to just specify what application the actor desires to access.
Networking between Kubernetes resources has many different facets. There are multiple resources that can communicate from within a Kubernetes cluster. KubeDNS and clusterIPs are great for hooking up internal services to speak to one another without exposing the services to the outside world.
Let’s briefly go over several Kubernetes networking concepts needed to network your services running on Kubernetes:
ClusterIP – A singular internal IP that refers to your service-only usable from within a cluster.
Nodeport – Used to communicate where a deployment’s pod is running with an address of the form, NODE_IP:NODE_PORT. Note that NodePorts are >30000.
Kubedns – KubeDNS isn’t a service type so much as a built-in way to also communicate with a given service internally. With KubeDNS, you can actually communicate with pods without even associating an application with a service.
Loadbalancer – Creates an external load balancer in the current cloud (if supported) and assigns a fixed, external IP to the Service.
ClusterIP and KubeDNS make internal communication between services pretty simple. But what if we want to expose the application to the outside world? Nodeport is, on its own, a poor choice beyond testing. Kubernetes scheduling doesn’t guarantee that pods will always run on the same nodes because getting a single IP to hook into your dns only works with cloud providers.
Kubernetes ingress controllers are layer 7 load balancers that run on Kubernetes itself! This means that no cloud provider is providing the glue between the Kubernetes API and a load balancer. An external load balancer will still be of use in certain architectures. We will go into this later. The load balancer itself is running on Kubernetes and the Ingress manages external access to the services in a cluster. It’s basically a collection of rules that allow inbound traffic to reach the cluster services. While not as full-featured as a load balancer, it gives you what you would need from one and is much easier and faster to deploy. In fact, it’s so tidy that it allows you to set up a new routing from Layer 7 routing on your terminal with one command. If running smoothly, it will remove the headache of setting up a load balancer and make for a tidy, self-contained application delivery.
Services are the glue between a set of logically connected pods that are exposed mostly as ip addresses that are routable internally. Kubernetes ingresses serve as the glue between ingress rules and services. These rules are a combination of hostnames and pathnames.
Here’s an overview of a couple of potential architectures using Ingress to route to your services:
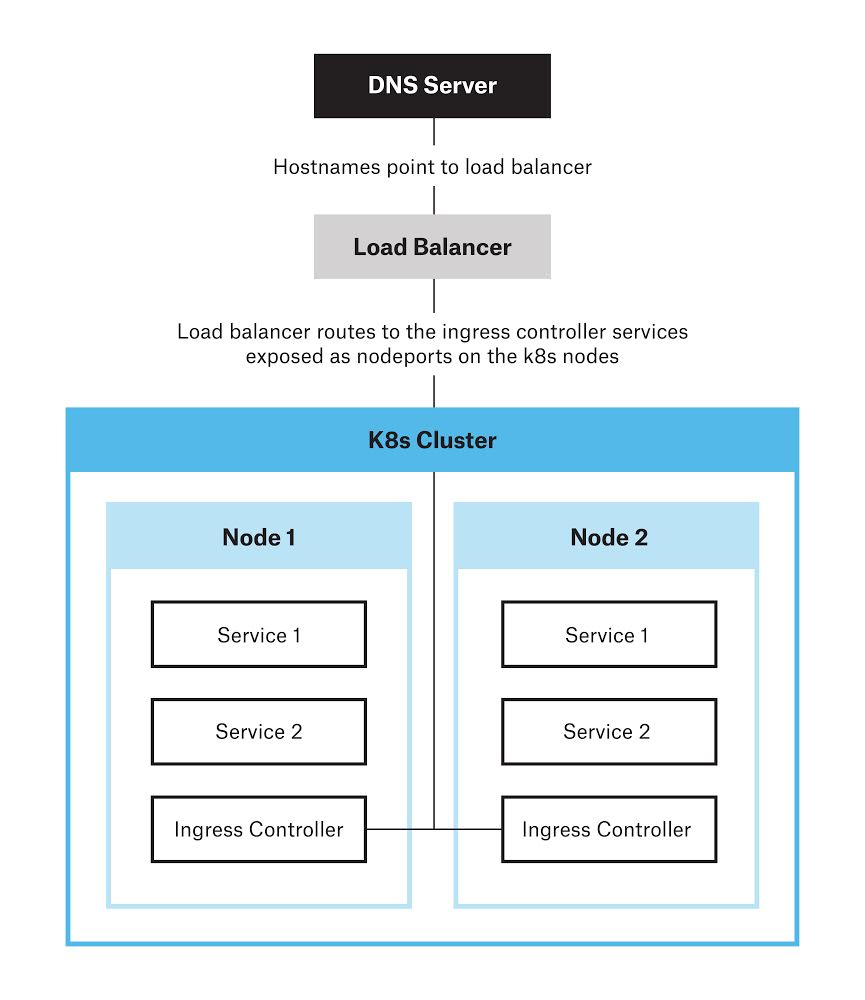
The architecture above involves running an Ingress controller as a daemon set, which is a resource that ensures every node is running a copy of a given pod. These Ingress controllers are exposed as a nodeport, and a load balancer routes traffic to the ingress controllers who in turn route traffic to the right services and backends.
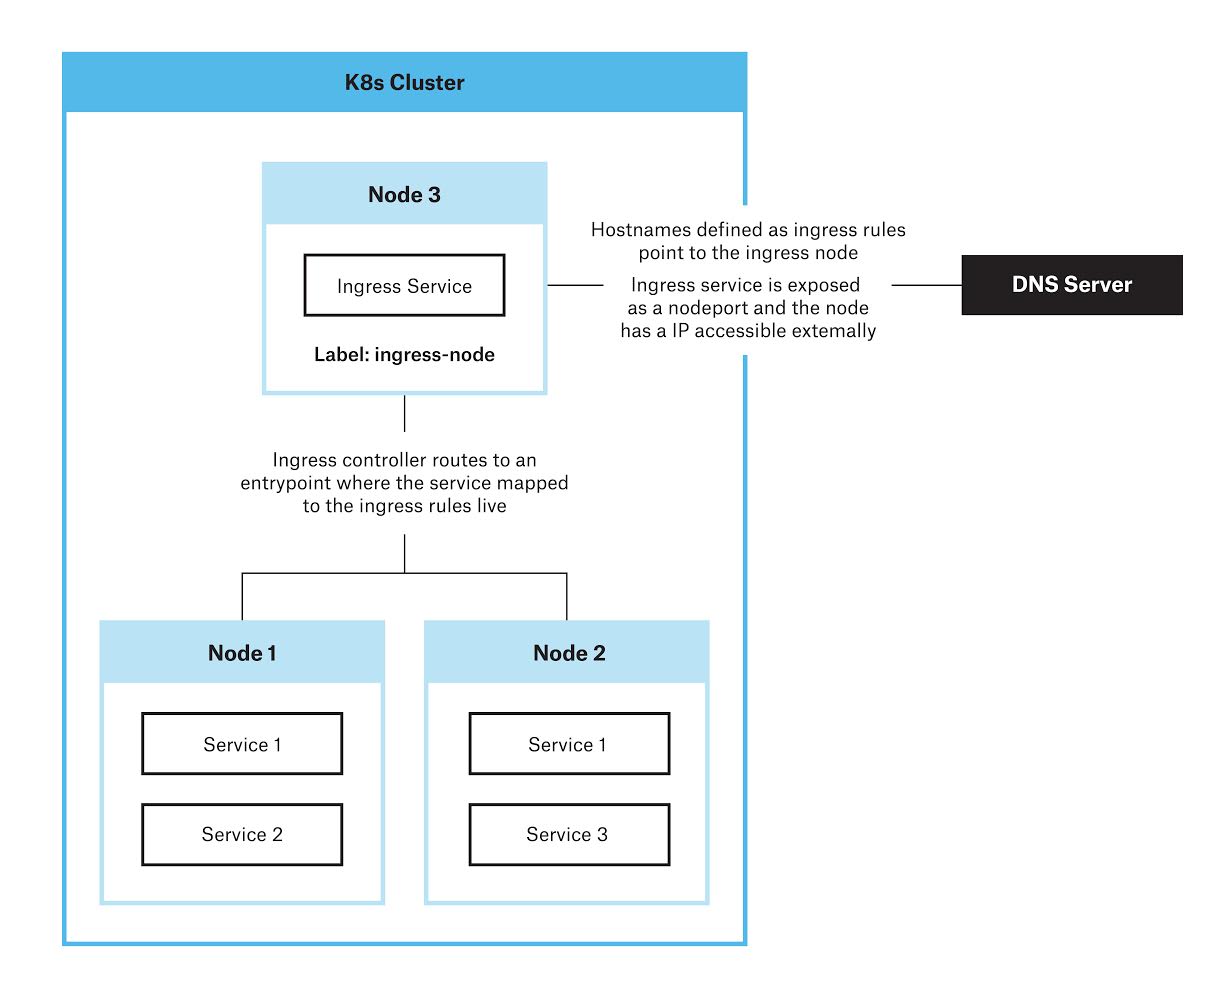
The architecture above involves having a dedicated Kubernetes node where only the ingress controller is scheduled and routing all external traffic directly to this node.
How to Deploy Ingresses on a Vanilla Kubernetes Deployment
This short how-to is to create an ingress running on a labelled node. We assume you have access to a running K8s cluster. This ingress has automatic http to https redirection, and we assume you have certificates for the hostnames you want to be routing to. Try letsencrypt for free ones! Note: that this how-to is for the second architecture we showed. It is not a high-availability deployment but it works well for dev environments. For an HA deployment you likely want to use the daemon set and load-balancer approach of the first architecture.
Step 1 – Let’s label the node we want to be the ingress node
kubectl label node node-role.kubernetes.io/ingress=true
Step 2 – Let’s create an namespace called ingress-demo where we’ll be running the ingress controller.
kubectl create ns ingress-demo
We should also switch our kube config’s context to this namespace for the remainder of the how-to.
kubectl config set-context $(kubectl config current-context) --namespace=ingress-demo
Step 3 – Let’s install our actual ingress controller. This should run the ingress node and is in charge of reading from ingress resource types and routing hostnames appropriately. If we create ingress resources without an ingress controller on our cluster, nothing will happen. There are a variety of ingress controllers that can be used by K8s, Kubernetes supports and maintains the GCE and nginx controllers, but for this demo we will be using the Traefik controller.
For HTTPS support we first must mount an ssl secret to Traefik our deployment can read from. This will create a secret called ingress-cert
kubectl create secret tls ingress-cert --cert <./path-to-cert> --key <./path-to-key>
Let’s install the configmap that the deployment will mount as a volume holding the traefik configuration.
kubectl create cm traefik-ingress-cm --from-file=./traefik-ingress.toml
We will also need to create appropriate roles so our ingress can read from resources across namespaces.
kubectl create -f ./ingress-rbac.yaml
Now we’re ready to create our deployment!
kubectl create -f ./ingress-deploy.yaml
If you run the code below, you should now see a traefik-ingress-deployment pod running.
kubectl get pods
Now you’re free to create ingress resources that match route to your services! Remember to change your DNS servers or hostfile to point to the ingress node!
You can find the full repository here.
While various Kubernetes toolings have their advantages, running your own clusters gives you much greater control over the configuration. For example, it enables you to select any storage class you want instead of being dictated one by your cloud provider. You can also switch between ingress providers while still remaining attached to the ecosystem. As a Kubernetes resource, ingresses are open source code providers that allow communication between Kubernetes pods. They all have the same interface, but they come in many different forms. Running Ingresses on your own cluster may require more time and expertise, but gives you flexibility to customize your own deployments. Whether you run your Kubernetes pods as daemon sets or where only the ingress controller is scheduled, understanding and implementing the best architecture will optimize the communications between your microservices.
To learn more, sign up for one of our hands-on, three-day workshop on containerizing applications with Docker and Kubernetes.
 Evan M.
Evan M. is a programmer living and working in Montreal. His hobbies include dog sitting, taking his Grandma out to dinner and cycling year-round. Evan is a Cloud Developer at CloudOps with a passion for all things Kubernetes.