The Ultimate Rook and Ceph Survival Guide

Containers are built with statelessness as a core principle, but data must still be stored and made accessible to some services. You therefore need a solution that preserves data in the event of container restarts.
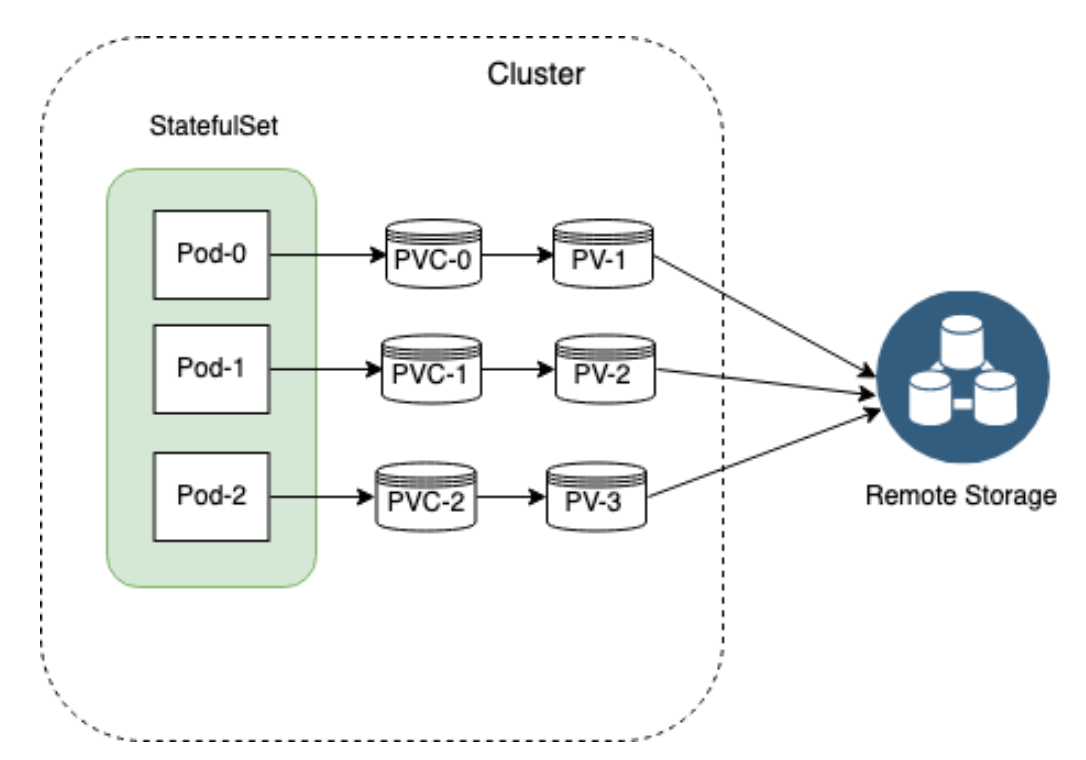
Persistent Volume Claims (PVCs) are the recommended solution to manage stateful applications in Kubernetes. With a PVC, a Pod can request and connect to volumes, which exist independent of the enclosing Pod’s lifecycle.
PVCs offer the advantage of separating Ops from Devs. Cloud administrators can provision volumes. Developers can request these volumes without knowing their backend providers.
These are the components of a PVC:
- Persistent Volume Claims are requests for storage by a Pod. PVCs are dynamically mounted into requesting Pods and will be used as a volume.
- Persistent Volumes are the specific volumes provisioned manually by Administrators or dynamically by the StorageClass. PVs are not tied to a particular Pod and are managed by Kubernetes.
- Storage classes allow the dynamic allocation of volumes and PVs. Classes are defined by administrators.
- Physical storages are the actual volumes being connected to and mounted.
Distributed storage systems are an effective way to solve the High Available Statefulsets. Ceph is a distributed storage system that started gaining attention in the past few years. Rook is an orchestrator for a diverse set of storage solutions including Ceph. Rook simplifies the deployment of Ceph in a Kubernetes cluster.
The list of companies using Rook with Ceph in production is growing, especially for companies deploying on Prem, amongst them CENGN, Gini, RPR and many in the evaluation stage.
What is Ceph?
Ceph is a distributed storage system that is massively scalable and high-performing with no single point of failure. Ceph is a Software Distributed System (SDS), meaning it can be run on any hardware that matches its requirements.
Ceph consists of multiple components:
- Ceph Monitors (MON) are responsible for forming cluster quorums. All the cluster nodes report to monitor nodes and share information about every change in their state.
- Ceph Object Store Devices (OSD) are responsible for storing objects on local file systems and providing access to them over the network. Usually, one OSD daemon is tied to one physical disk in your cluster. Ceph clients interact with OSDs directly.
- Ceph Manager (MGR) provides additional monitoring and interfaces to external monitoring and management systems.
- Reliable Autonomic Distributed Object Stores (RADOS) are at the core of Ceph storage clusters. This layer makes sure that stored data always remains consistent and performs data replication, failure detection, and recovery among others.
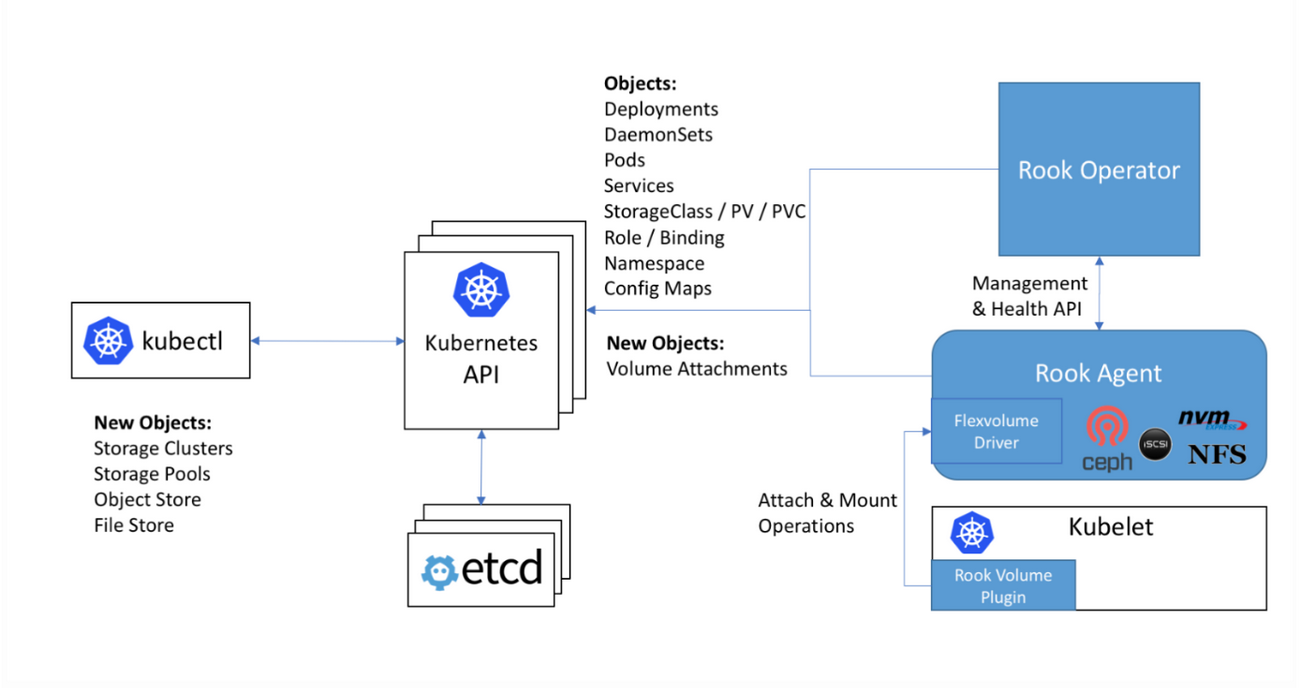
To read/write data from/to a Ceph cluster, a client will first contact Ceph MONs to obtain the most recent copy of their cluster map. The cluster map contains the cluster topology as well as the data storage locations. Ceph clients use the cluster map to figure out which OSD to interact with and initiate a connection with the associated OSD.
What is Rook?
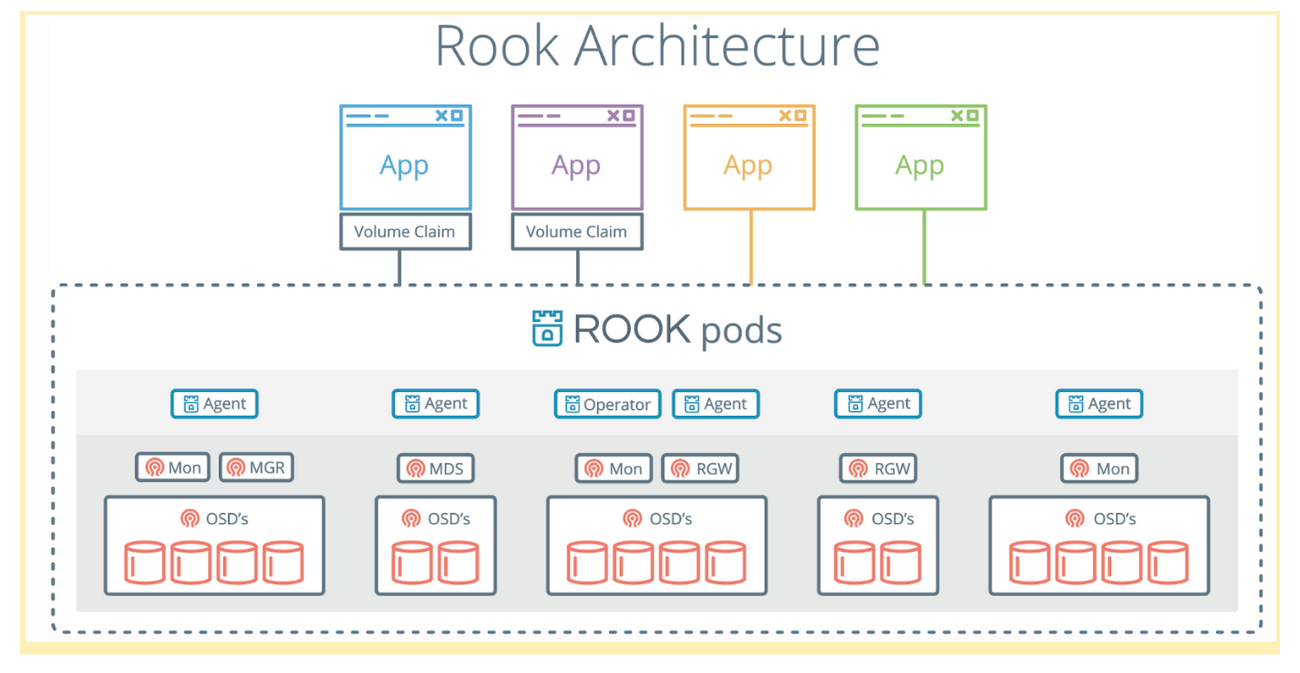
Rook is an operator that manages your Ceph clusters for you. Rook uses Custom Resource Definitions (CRDs) and a custom controller to deploy and manage custom resources, such as Ceph clusters.
Rook consists of multiple components:
- Rook Operator is the core of Rook. The Rook operator is a simple container that automatically bootstraps the storage clusters and monitors the storage daemons to ensure the storage clusters are healthy.
- Rook Agents run on each storage node and configure a FlexVolume plugin that integrates with Kubernetes’ volume controller framework. Agents handle all storage operations such as attaching network storage devices, mounting volumes on the host, and formatting the filesystem.
- Rook Discovers detect storage devices attached to the storage node.
Rook also deploys MON, OSD and MGR daemons for the Ceph clusters as Kubernetes pods.
The Rook Operator enables you to create and manage your storage clusters through CRDs. Each type of resource has its own CRD defined.
- A Rook Cluster provides the settings of the storage cluster to serve block, object stores, and shared file systems. Each cluster has multiple pools.
- A Pool manages the backing store for a block store. Pools are also used internally by object and file stores.
- An Object Store exposes storage with an S3-compatible interface.
A File System provides shared storage for multiple Kubernetes pods.
How to deploy Rook in Kubernetes
In this guide we will go over the steps to deploy Rook in the same Kubernetes cluster as the clients consuming the storage. Since Ceph requires extra drives to store the data, it is recommended to have a set of dedicated storage nodes.
Pre-requisites
- Helm
- Kubernetes Cluster with RBAC enabled
Disk Configuration
This guide assumes unformatted disks on the storage nodes. In order to maximize their performance, you may want to locate the Write Ahead Log (WAL) on a separate device (not in the scope of this post).
Configure FlexVolume (if necessary)
Rook agents use FlexVolume to integrate with Kubernetes for performing storage operations. To do so, Rook agents deploy the Rook FlexVolume driver to a directory on every node.
The default directory of FlexVolume is read-only in some cases, such as Rancher and CoreOS. In this case, the Kubelet needs to be configured to use a different directory that is writable.
If using Rancher Kubernetes Engine (RKE), configure kubelet as follows and run `rke up` to apply.
kubelet:
  image: ""
  extra_args:
    volume-plugin-dir: /usr/libexec/kubernetes/kubelet-plugins/volume/exec
  extra_binds:
    - /usr/libexec/kubernetes/kubelet-plugins/volume/exec:/usr/libexec/kubernetes/kubelet-plugins/volume/exec
Install the Rook Operator
Add the ‘Rook Charts’ repo to Helm.
helm repo add rook-stable https://charts.rook.io/stable
helm install --name rook --namespace rook-ceph-system rook-stable/rook-ceph

$ kubectl get po -n rook-ceph-system -o wide
NAME                                  READY   STATUS    RESTARTS   AGE   IP              NODE                      NOMINATED NODE
rook-ceph-agent-gwl8s                 1/1     Running   0          35d   10.212.144.51   coo-r1-k8s-worker-st-01
rook-ceph-agent-lqkjl                 1/1     Running   0          35d   10.212.144.52   coo-r1-k8s-worker-st-02
rook-ceph-agent-x66sw                 1/1     Running   0          35d   10.212.144.53   coo-r1-k8s-worker-st-03
rook-ceph-operator-7d44ddfdcb-q5chh   1/1     Running   0          35d   10.244.8.3      coo-r1-k8s-worker-st-03
rook-discover-fmqrd                   1/1     Running   0          35d   10.244.7.5      coo-r1-k8s-worker-st-01
rook-discover-jlsv9                   1/1     Running   0          35d   10.244.6.3      coo-r1-k8s-worker-st-02
rook-discover-vt7mk                   1/1     Running   0          35d   10.244.8.4      coo-r1-k8s-worker-st-03
The helm chart deploys the rook-related pods (rook-operator, rook-discover and rook-agent) as well as CustomResourceDefinition for Ceph cluster among others. The discover pods run a discovery script to locate storage devices attached to the Kubernetes storage nodes.
Please note that all pods in rook-ceph-system should be Running or Completed with no restarts or errors before proceeding to the next step.
Create a Ceph Cluster managed by Rook
The next step is to create a Ceph cluster. From the ‘rook’ source tree. Click here to view the git clone. At cluster/examples/kubernetes/ceph, inspect, and modify
cluster.yamlto your liking. The cluster CRD defines desired settings for a storage cluster. Simply run the following command to bootstrap a rook cluster:
kubectl create -f cluster.yamlTo confirm our Rook cluster is now working, let’s check the running pods under the rook-ceph namespace:
$ kubectl get po -n rook-ceph -o wide
NAME                                                  READY   STATUS      RESTARTS   AGE   IP              NODE                      NOMINATED NODE
rook-ceph-mgr-a-bf78cdcb8-q4gpz                       1/1     Running     0          35d   10.244.7.7      coo-r1-k8s-worker-st-01
rook-ceph-mon-a-755d985488-72kzh                      1/1     Running     0          35d   10.244.7.6      coo-r1-k8s-worker-st-01
rook-ceph-mon-b-845c97f94b-h5jlp                      1/1     Running     0          35d   10.244.6.4      coo-r1-k8s-worker-st-02
rook-ceph-mon-c-68b495d97d-m524q                      1/1     Running     0          35d   10.244.8.7      coo-r1-k8s-worker-st-03
rook-ceph-osd-0-56b7b86b5b-kz882                      1/1     Running     0          35d   10.244.7.9      coo-r1-k8s-worker-st-01
rook-ceph-osd-1-6d9558b6bd-xlkzf                      1/1     Running     0          35d   10.244.6.6      coo-r1-k8s-worker-st-02
rook-ceph-osd-2-56bf4b6c64-2p9rp                      1/1     Running     0          35d   10.244.8.9      coo-r1-k8s-worker-st-03
rook-ceph-osd-3-86ccf5d69f-xzjmz                      1/1     Running     0          35d   10.244.7.10     coo-r1-k8s-worker-st-01
rook-ceph-osd-4-6f469fc877-bt799                      1/1     Running     0          35d   10.244.6.7      coo-r1-k8s-worker-st-02
rook-ceph-osd-5-6549cdf949-qbvnh                      1/1     Running     0          35d   10.244.7.11     coo-r1-k8s-worker-st-01
rook-ceph-osd-6-7f56d8cf95-qgd8p                      1/1     Running     0          35d   10.244.6.8      coo-r1-k8s-worker-st-02
rook-ceph-osd-7-55b6c5c8df-dnp4p                      1/1     Running     0          35d   10.244.8.11     coo-r1-k8s-worker-st-03
rook-ceph-osd-8-d6df7694-w2psw                        1/1     Running     0          35d   10.244.8.10     coo-r1-k8s-worker-st-03
rook-ceph-osd-prepare-coo-r1-k8s-worker-st-01-zbs6m   0/2     Completed   0          35d   10.244.7.8      coo-r1-k8s-worker-st-01
rook-ceph-osd-prepare-coo-r1-k8s-worker-st-02-sr2dm   0/2     Completed   0          35d   10.244.6.5      coo-r1-k8s-worker-st-02
rook-ceph-osd-prepare-coo-r1-k8s-worker-st-03-zzqmq   0/2     Completed   0          35d   10.244.8.8      coo-r1-k8s-worker-st-03
rook-ceph-tools-cb5655595-vq4vj                       1/1     Running     0          35d   10.212.144.53   coo-r1-k8s-worker-st-03
You will see that Rook starts deploying a couple of
monas well as
osd-preparepods.
rook-ceph-osd-preparepods prepare the OSD by formatting the disk and adding the
osdpods into the cluster.
Rook also comes with a
toolkitcontainer that has the full suite of Ceph clients for rook debugging and testing. After running
kubectl create -f toolkit.yamlin the cluster, use the following command to get into the pod:
Cluster configuration tips:
Define
mon.countto be an odd number greater than 3.
Define resource limits for the Ceph components:
mgr:
	limits:
		cpu: "500m"
		memory: "1024Mi"
	requests:
		cpu: "500m"
		memory: "1024Mi"
mon:
	limits:
		cpu: "1"
		memory: "1024Mi"
	requests:
		cpu: "500m"
		memory: "1024Mi"
osd:
	limits:
		cpu: "1"
		memory: "2048Mi"
	requests:
		cpu: "500m"
		memory: "1024Mi"
I recommend to make all the storage nodes as homogenous as possible with the same CPU, RAM and Disks. This enables me to use the deviceFilter feature:
storage:
  useAllNodes: true
  useAllDevices: false
  deviceFilter: sd[a-z]
Which looks for all devices matching the regex
/dev/sd[a-z].Create Ceph Replica Pool and Kubernetes Storage Class
The pool CRD defines the desired settings for a pool. Rook offers two mechanisms to sustain the loss of OSDs: replication and erasure coding. Replication is the default choice, meaning every object is replicated on multiple disks depending on spec.replicated.size. Take note to specify a replication size that fits your use case. I recommend at least 2 for non prod, 3 for prod (but depends on your cluster size obviously).
Erasure coding (EC) is another alternative that saves space. EC breaks data into n chunks (spec.erasureCoded.dataChunks), adds k coding chunks (spec.erasureCoded.codingChunks) and stores n+k chunks in a distributed manner on disks. In this case, Ceph can tolerate the loss of k OSDs.
# pool with replication enabled
apiVersion: ceph.rook.io/v1
kind: CephBlockPool
metadata:
  name: replicated-metadata-pool
  namespace: rook-ceph
spec:
  replicated:
    size: 2
---
# pool with EC enabled
apiVersion: ceph.rook.io/v1
kind: CephBlockPool
metadata:
  name: ec-data-pool
  namespace: rook-ceph
spec:
  erasureCoded:
    dataChunks: 2
    codingChunks: 1
In this guide, we will rely on replication to keep the data redundant.
StorageClasses are the core of the dynamic provisioning of Persistent Volumes in Kubernetes. Here is an example of a StorageClass for the Ceph block storage.
apiVersion: storage.k8s.io/v1
kind: StorageClass
metadata:
   name: rook-ceph-block
provisioner: ceph.rook.io/block
parameters:
  # The replicated pool as the `blockPool` parameter
  blockPool: replicated-metadata-pool
  # The erasure coded pool must be set as the `dataBlockPool` parameter below.
  dataBlockPool: ec-data-pool
  clusterNamespace: rook-ceph
To create a Ceph replica pool and StorageClass, simply apply the
storageclass.yamlmanifest that is included in the same location as
cluster.yaml.kubectl create -f storageclass.yamlTest Storage
To test your setup, create a PVC using the name of StorageClass that you created in the previous step.
apiVersion: v1
kind: PersistentVolumeClaim
metadata:
  name: mysql-pv-claim
  labels:
    app: wordpress
spec:
  storageClassName: rook-ceph-block
  accessModes:
  - ReadWriteOnce
  resources:
    requests:
      storage: 5Gi
Check the status of PVC to make sure it is in “Bounded” status
$ kubectl get pvc
NAMESPACE       NAME                                     STATUS    VOLUME                                     CAPACITY   ACCESS MODES   STORAGECLASS      AGE
default   mysql-pv-claim                                 Bound     pvc-f1af6df6-474a-11e9-8360-02006e76001e   8Gi        RWO            rook-ceph-block   1m
Common Ceph Commands
Once inside the toolbox pod, you can interact with Ceph clusters and run commands. Here is a list of useful commands to check the status of your cluster.
Overall Cluster Status
$ ceph status
  cluster:
    id:     62e69dc1-efb5-42d9-a7bc-1ea6cfbd467f
    health: HEALTH_OK
services:
mon: 3 daemons, quorum c,a,b
mgr: a(active)
osd: 9 osds: 9 up, 9 in
data:
pools:   1 pools, 100 pgs
objects: 236  objects, 406 MiB
usage:   10 GiB used, 1.7 TiB / 1.8 TiB avail
pgs:     100 active+clean
io:
client:   38 KiB/s wr, 0 op/s rd, 3 op/s wr
Detailed Health Status
This is useful for identifying bad physical groups that need repairs.
$ ceph health detail
HEALTH_OK
Status of all OSDs
$ ceph osd status
+—-+————————-+——-+——-+——–+———+——–+———+———–+
| id |           host          |  used | avail | wr ops | wr data | rd ops | rd data |   state   |
+—-+————————-+——-+——-+——–+———+——–+———+———–+
| 0  | coo-r1-k8s-worker-st-01 | 1149M |  198G |    0   |  13.6k  |    0   |     0   | exists,up |
| 1  | coo-r1-k8s-worker-st-02 | 1157M |  198G |    0   |     0   |    0   |     0   | exists,up |
| 2  | coo-r1-k8s-worker-st-03 | 1143M |  198G |    0   |     0   |    0   |     0   | exists,up |
| 3  | coo-r1-k8s-worker-st-01 | 1128M |  198G |    0   |     0   |    0   |     0   | exists,up |
| 4  | coo-r1-k8s-worker-st-02 | 1180M |  198G |    4   |  37.6k  |    0   |     0   | exists,up |
| 5  | coo-r1-k8s-worker-st-01 | 1169M |  198G |    1   |  12.0k  |    0   |     0   | exists,up |
| 6  | coo-r1-k8s-worker-st-02 | 1109M |  198G |    0   |     0   |    0   |     0   | exists,up |
| 7  | coo-r1-k8s-worker-st-03 | 1160M |  198G |    0   |  1638   |    0   |     0   | exists,up |
| 8  | coo-r1-k8s-worker-st-03 | 1143M |  198G |    0   |  3276   |    0   |     0   | exists,up |
+—-+————————-+——-+——-+——–+———+——–+———+———–+
Ceph Pool Details
$ ceph osd pool ls detail
pool 1 ‘replicapool’ replicated size 3 min_size 1 crush_rule 1 object_hash rjenkins pg_num 100 pgp_num 100 last_change 37 flags hashpspool,selfmanaged_snaps stripe_width 0 application rbd
removed_snaps [1~3]
Show Pool and Total Usage
$ rados df
POOL_NAME      USED OBJECTS CLONES COPIES MISSING_ON_PRIMARY UNFOUND DEGRADED RD_OPS      RD  WR_OPS     WR

replicapool 1.4 GiB     575      0   1150                  0       0        0   1224 2.4 MiB 1698291 84 GiB
total_objects    575
total_used       5.6 GiB
total_avail      294 GiB
total_space      300 GiB
Using the StorageClass with Kubernetes Apps/Helm Charts
Most, if not all Helm charts have configuration options that allow overriding the StorageClass. Here is an example:
helm install –name=redis stable/redis

–set master.persistence.storageClass=rook-ceph-block

–set slave.persistence.storageClass=rook-ceph-block
Re-Installation
Full Reinstall including RKE
Disclaimer: The following instructions erase the data and are not recommended to be executed on the Production cluster.
Rook can be tricky to re-install, because a lot of data is stored on the local storage nodes. If you are using RKE, wipe data from the worker and master nodes, and reinstall RKE completely. To clean up:
# remove rke docker and everything
sudo apt -y purge docker-ce

&& sudo apt -y autoremove

&& sudo rm -rf /var/lib/docker

&& sudo rm -rf /opt/*

&& sudo rm -rf /var/lib/rook

&& sudo rm -rf /var/lib/etcd

&& sudo rm -rf /var/lib/cni

&& sudo rm -rf /var/lib/containerd

&& sudo rm -rf /var/lib/calico

&& sudo rm -rf /var/lib/kubelet

&& sudo rm -rf /var/lib/rancher
This removes all trace of docker, Rook and RKE and related components.
If this is running on a live worker/master, you should reboot after running this command, and then run it again (some files are locked by running processes), and then proceed to do full reinstall (docker included!)
You will also need to format the disks that have been used by Rook/Ceph.
$ sudo fdisk /dev/sdb
Welcome to fdisk (util-linux 2.29.2).
Changes will remain in memory only, until you decide to write them.
Be careful before using the write command.
Device /dev/sdb already contains a LVM2_member signature.
The signature will be removed by a write command.
Device does not contain a recognized partition table.
Created a new DOS disklabel with disk identifier 0xa24124a7.
Command (m for help):
Then simply type ‘w’ and “enter” and it will overwrite the partition table and make the disks ready to use again by Rook/Ceph. I recommend a reboot after wiping the disk to ensure nothing is bound or has open file handles to it.
Just Rook
Deleting the namespaces rook-ceph and rook-ceph-system can get you into trouble. To tear down the Ceph cluster:
Delete the resources created on top of the rook cluster (pool, storageClass, PVC, …) .
kubectl delete -n rook-ceph cephblockpool replicapool
kubectl delete storageclass rook-ceph-block
Delete the cluster CRD and the operator helm chart.
kubectl -n rook-ceph patch clusters.ceph.rook.io rook-ceph -p ‘{“metadata”:{“finalizers”: []}}’ –type=merge
kubectl -n rook-ceph delete cephcluster rook-ceph
helm delete –purge rook
kubectl delete namespace rook-ceph
Connect to each machine and delete
/var/lib/rookor the path specified by
dataDirHostPathIf you face any issue, you can consult this page.
Diagnostics
Physical Group Repair
Occasionally, Ceph status can say that Physical Groups need repair. To execute this, connect into the toolbox pod:
$ ceph health detail
HEALTH_ERR
1 pgs inconsistent; 2 scrub errors
pg 0.6 is active+clean+inconsistent, acting [0,1,2] 2 scrub errors
This indicates Physical Group 0.6 needs repair. To repair:
ceph pg repair 0.6This will initiate a repair which can take a minute to finish. Afterwards, “health” should be
HEALTH_OKChanging Replicated Size
If replicated size is not set properly, you can set this on a running replicapool (called replicapool in this example). Once inside the toolbox pod:
ceph osd pool set replicapool size 3
ceph osd pool set replicapool min_size 3
Changing Physical Groups Number
To change PG size for replica pool, once inside toolbox pod:
ceph osd pool set replicapool pg_num 256
ceph osd pool set replicapool pgp_num 256
Rook and Ceph can help teams find cloud native solutions for storage. To learn more about DevOps tools, sign up for one of our hands-on DevOps workshops. We offer public trainings on Docker and Kubernetes as well as DevOps Monitoring in a variety of cities as well as private trainings on a wider variety of subjects in any city. Contact us to learn more about how CloudOps can help your organization find DevOps solutions.

References
- https://github.com/rook/rook/blob/master/Documentation/ceph-toolbox.md
- http://docs.ceph.com/docs/mimic/rados/troubleshooting/troubleshooting-pg/
- http://docs.ceph.com/docs/jewel/rados/operations/placement-groups/#set-the-number-of-placement-groups
- http://accelazh.github.io/ceph/Ceph-Performance-Tuning-Checklist
- https://github.com/rook/rook/blob/master/Documentation/advanced-configuration.md
- https://github.com/rook/rook/blob/master/Documentation/common-issues.md
- http://docs.ceph.com/docs/giant/rados/troubleshooting/troubleshooting-osd/